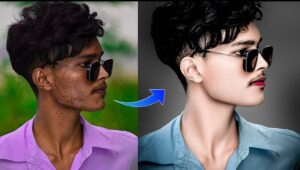
Mastering Photo Editing in Autodesk SketchBook
Introduction
Autodesk SketchBook is a powerful tool for artists, designers, and illustrators. While it’s primarily known for its sketching capabilities, it’s also a great choice for photo editing. In this blog post, we’ll explore how to enhance your photos using SketchBook.
Importing Your Image
- Open SketchBook: Launch the app on your device.
- Import Image: In the toolbar, click on “Import Image.”
- Choose Your Photo: Select the image you want to edit from your device.
- Position and Adjust: Use the Transform tools to resize, move, and rotate the image as needed.
Basic Edits
- Brightness and Contrast:
- Go to the Layer Editor and adjust the Brightness/Contrast layer.
- Increase brightness to make the image lighter or decrease it for a darker look.
- Adjust contrast to enhance details.
- Color Corrections:
- Create a new layer and set its blending mode to Color.
- Use the Brush tool with a low opacity to paint over areas that need color correction.
Advanced Techniques
- Layer Masks:
- Add a layer mask to isolate specific parts of the image.
- Use the Brush tool with black or white to reveal or hide portions selectively.
- Filters and Effects:
- Explore the Filters menu for effects like Gaussian Blur, Sharpen, and Distort.
- Apply filters to create unique looks.
Final Touches
- Save Your Work: Once satisfied, save your edited image.
- Export Options: Choose the appropriate format (JPEG, PNG, etc.) for your needs.
Mastering
HD Face Photo Editing in Autodesk SketchBook
1. Importing Your Face Photo
- Open SketchBook: Launch the app on your device.
- Import Image: Click on “Import Image” in the toolbar.
- Choose Your Photo: Select a high-resolution face photo from your gallery.
- Position and Adjust: Use the Transform tools to resize, move, and rotate the image until the face is centered.
2. Basic Retouching
- Skin Smoothing:
- Create a new layer and name it “Skin.”
- Use the Brush tool with a soft brush and low opacity.
- Paint over blemishes, wrinkles, and uneven skin tones.
- Adjust the layer opacity to maintain a natural look.
- Brighten Eyes and Teeth:
- Create separate layers for eyes and teeth.
- Use the Dodge tool to brighten the whites of the eyes and teeth.
- Adjust the layer opacity for a subtle effect.
3. Digital Makeup
- Lip Color:
- Create a new layer for lips.
- Use the Brush tool to apply lipstick or lip gloss.
- Experiment with blending modes (Overlay, Soft Light) for realistic results.
- Eyeshadow and Eyeliner:
- Create separate layers for eyeshadow and eyeliner.
- Use soft brushes and adjust opacity.
- Blend colors to create a natural or dramatic look.
4. Advanced Techniques
- Frequency Separation:
- Duplicate your image layer.
- Apply a Gaussian Blur to the duplicate layer.
- Set the original layer to “Linear Light” blending mode.
- Use the duplicate layer to retouch imperfections without affecting texture.
- Sculpting and Contouring:
- Create a new layer for contouring.
- Use the Brush tool with a low opacity.
- Add shadows to define cheekbones, jawline, and nose.
5. Creative Effects
- Digital Painting:
- Experiment with brushes, blending modes, and layers.
- Turn your face photo into a digital painting by adding strokes and textures.
- Surreal Edits:
- Combine face photos with other images (e.g., landscapes, textures).
- Use layer masks to seamlessly blend elements.
6. Final Touches and Export
- Save Your Work:
- Save your edited image as a SketchBook file (for future edits).
- Export a high-resolution JPEG or PNG for sharing.
HD Face Photo Editing: Unleashing Your Inner Artist with Autodesk SketchBook
Autodesk SketchBook, often hailed as a digital canvas for artists, has quietly emerged as a powerful tool for photo editing as well. While primarily known for its drawing and painting capabilities, its versatile feature set allows for meticulous manipulation of images, particularly when it comes to enhancing facial features. Let’s delve into the world of HD face photo editing using this often overlooked gem.
Why Choose Autodesk SketchBook for Face Editing?
You might wonder why an art app would be your go-to for photo editing. The answer lies in its precision and control. Unlike many photo editing software that offer pre-set filters and automated enhancements, SketchBook empowers you to take granular control over every aspect of your image.
- High Resolution Canvas: SketchBook supports high-resolution images, ensuring that even the minutest details of a face are preserved and enhanced.
- Versatile Brush Set: From soft airbrushes for subtle adjustments to hard-edged brushes for precise corrections, SketchBook offers a vast array of tools tailored for facial editing.
- Layer Functionality: This indispensable feature allows you to work non-destructively, experimenting with different effects without affecting the original image.
- Customization: With customizable brushes, colors, and blending modes, you can create a truly unique and personalized look.
A Step-by-Step Guide to HD Face Editing
- Import Your Image: Begin by importing your high-resolution photo into SketchBook. Ensure the image is clear and well-lit for optimal results.
- Duplicate the Layer: Create a duplicate of the original layer to preserve the original image. This layer will be your canvas for edits.
- Skin Refinement:
- Use a soft airbrush to gently smooth out skin imperfections.
- Employ a darker shade to add subtle shadows for depth and contour.
- Enhance facial features like cheekbones and jawline by adding highlights and shadows.
- Eye Enhancement:
- Use a small, hard brush to define the iris and pupil.
- Add highlights to the eyes to make them sparkle.
- Carefully adjust the eyebrow shape and thickness.
- Lip Perfection:
- Create a base color for the lips using a soft brush.
- Add highlights and shadows to give the lips a 3D appearance.
- Use a darker shade to define the lip line.
- Color Correction:
- Adjust the overall color tone of the image if needed.
- Use color balance or hue/saturation tools for fine-tuning.
- Sharpening:
- Apply a subtle sharpening effect to enhance facial details.
- Be cautious to avoid over-sharpening, which can lead to a harsh look.
Beyond the Basics
While these steps provide a foundation for HD face editing in SketchBook, the possibilities are endless. Experiment with different brush techniques, layer blending modes, and color combinations to achieve your desired look. Consider using the app’s symmetry tools for precise adjustments to facial features.
Face Enhancement with Autodesk SketchBook
In an era dominated by heavily filtered, often unrealistic beauty standards, digital art offers a unique opportunity to explore a more nuanced approach to facial enhancement. Autodesk SketchBook, a powerful yet intuitive digital painting tool, provides a canvas for artists to refine features, correct imperfections, and enhance natural beauty without resorting to drastic alterations.
The Art of Smoothing: A Balanced Approach
Smoothing skin should aim to create a flawless, natural appearance rather than an artificial mask. Here’s a step-by-step guide:
- Duplicate Layer: Create a duplicate of your original layer to preserve the original image.
- Low Opacity Brush: Use a soft airbrush with low opacity to gently blend over imperfections. Focus on areas with blemishes, pores, or fine lines.
- Frequency Separation (Optional): For more advanced users, frequency separation can help isolate texture and color information, allowing for precise smoothing.
- Blending Modes: Experiment with blending modes like Soft Light or Overlay to subtly enhance the smoothed effect.
Whitening with Care: A Delicate Touch
Whitening should complement the overall skin tone and avoid creating an unnatural appearance.
- Color Balance: Use the Hue/Saturation adjustment layer to subtly shift the overall color temperature towards warmer tones.
- Dodge and Burn: Carefully lighten areas like the forehead, cheekbones, and nose bridge to create a subtle brightening effect.
- Local Adjustments: Use a brush to selectively brighten specific areas, such as the under-eye area, while maintaining natural shadows.
Download
Conclusion
Autodesk SketchBook empowers you to create professional-grade HD face edits. Whether you’re retouching portraits or exploring artistic effects, let your creativity flow. Remember to practice, experiment, and enjoy the process!
Leave a Reply